How to create your own Fashion model template (step-by-step & video tutorial)
Following my tutorial on How to draw better & faster Fashion sketches, I had to do another video showing to make the actual template = the much needed prequel.
Yes, I insist on this model template thing! Wait until you have to draw over 100 rough sketches for an 8-look project.
p.s.: sorry my Photoshop is in Portuguese.
Step-by-step instructions
Step 1: finding the right picture
We need a full body picture in good resolution and a plain background, so the best place to go is an online shop.

Topshop is a great place to start, as they have a really big collection and you can definitely find a picture that shows a lot of skin, whole legs, a fresh face and a “neutral” pose - so very template appropriate.

Make sure you save the higher resolution image and that both Front and Back are not too pose-y. This one is not the best Back picture, but it is still very good for 3/4 views (if you want to sketch track pants with side tapes, for example).
Step 2: Blank it out on Photoshop
This will be a template for you to draw over, so you don't want any clothes to distract from your own design.
You also don't need it to be in full colour, it's all about making it painfully easy to use whenever you want to get the ideas out of your head: you'll just print it out, grab a pen, marker or pencil, and sketch away without overthinking.
So first you're going to the Application Bar on the top of your screen, and click Image -> Adjustments -> Black and white.
You can then play with the dials on the BW control panel to make the skin as pale as possible, and the clothes you want to erase as dark as possible - without making the face look too weird!

Now you can easily replace smaller bits of clothing with a similar texture to the skin, using the Healing Brush tool.
You can find it on the Tool Bar (usually a long, vertical bar to the left), it's the little Band-Aid icon.
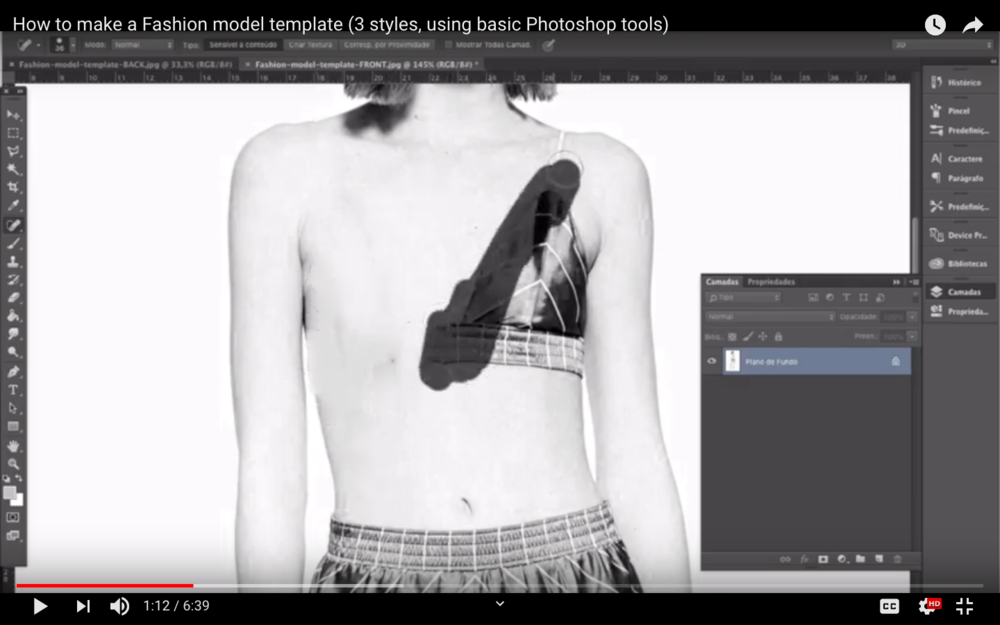
Click and move it over the bra, and see it become plain skin (instead of just plain white).
Larger areas will need more than just the healing brush, so you can:
- Double click the layers panel (highlighted in blue, on the bottom right corner). This will turn the picture into a Layer;
- Go around the bits you want gone with the Lasso tool;
- Use the Magnetic Lasso tool (click and hold the Lasso tool to see this option) to stick only to the darker coloured areas that you want to erase = the shorts, but not the legs!
And now you can go with the Healing Brush to fill in the legs with some skin!

Once your model looks like a naked Barbie doll, you can add in outlines of the breasts or hip bones, for example, IF you're too bothered by the lack of human features.
Give it a try:
- Create a New Layer on the bottom right panel;
- Draw a few lines to suggest the breasts, hip bones, light shadowing near the waist and abs with the Brush tool (hint: it looks like a brush and you can play with the width and colour of it);
- Go to Filters -> Blur -> Gaussian Blur so they look like natural shadowing, instead of harsh lines or thick ink blots.

I usually find that adding extra features end up making my template too “Alien trying to pass for Sexy Woman” realness for my taste, but hey - you do you.
Give it a shot and see what works for you.
Step 3: Make your model template printer-friendly
Printer ink is expensive AF and covering up all that grey is going to spend a lot of marker ink, too, but you still want to keep some of the shadowing and uneven outlines that gives your template that photorealistic Fashion Illustration look.
So the last thing is to achieve a good balance of blank areas and sensible, artsy shadowing.

Just go to the Application bar on the top, click on Image -> Adjustments -> Levels, and play around with the little arrows on the control panel.
Once you find the look you want for your model template, just save it as JPEG and you're ready to go through the same steps with the Back view.
If you want to see other template options, there are two more examples on my video tutorial, using pictures from a Lanvin collection that I found on Vogue Runway (former Style.com).
Enjoy the video, and have fun creating your own Fashion templates that will make you look like a seasoned designer.